<?xml version="1.0" encoding="utf-8"?><feed xmlns="http://www.w3.org/2005/Atom" ><generator uri="https://jekyllrb.com/" version="3.10.0">Jekyll</generator><link href="https://tleskin.github.io/atom.xml" rel="self" type="application/atom+xml" /><link href="https://tleskin.github.io/" rel="alternate" type="text/html" /><updated>2026-11-12T23:05:05+00:00</updated><id>https://tleskin.github.io/atom.xml</id><title type="html">Tom Codes</title><subtitle>Notes on building software — by a front-end engineer who came back to making things for fun.</subtitle><author><name>Tom Leskin</name><email>tleskin@gmail.com</email></author><entry><title type="html">Ember reading materials, including a free book</title><link href="https://tleskin.github.io/blog/ember-reading-materials/" rel="alternate" type="text/html" title="Ember reading materials, including a free book" /><published>2015-11-09T22:00:00+00:00</published><updated>2015-11-09T22:00:00+00:00</updated><id>https://tleskin.github.io/blog/ember-reading-materials</id><content type="html" xml:base="https://tleskin.github.io/blog/ember-reading-materials/"><![CDATA[<p>Learning a new concept or even a JavaScript framework can be hard. It’s even harder if the documentation isn’t that beginner friendly. Although that isn’t really the case with Ember, in my opinion, I still enjoy finding a good programming book to help teach me the concepts I need to learn and that will even help me build my first app using that new technology.</p>

<p>I’m still a beginner to Ember, but when I was just starting out, aside from learning from my instructor and the tutorials he created, I searched for a book that I could use to help get started. There are two books that I found and have been using to aide me in my learning of Ember, which I wanted to tell you all about today.</p>

<p>While some of the materials I found were a little outdated, one I settled on was called “ember-cli 101”. The book, now called “ember 101” is written by Adolfo Builes and helps you get started developing in Ember. It helps you build your first app, an app to help you keep track of items you lend to your friends, a bit different than the standard todo-list app and teaches you the main features of Ember CLI and how to use Ember Data.</p>

<p><img src="/assets/img/ember101.png" alt="ember 101" /></p>

<p>The cool thing about this book is that it was recently updated for Ember 2.0 and continues to be updated regularly, plus it’s now <strong>FREE!</strong>. Although you can still pay for it to contribute, Adolfo said he wanted to make a stronger commitment with the Ember community and make it accessible to everyone. The book is also now released under a creative commons license so anyone can edit and contribute to the book, which is in the spirit of Ember itself, built by an open source community. The <a href="https://github.com/abuiles/ember-101">source code for the book can be found here</a>. With almost 3000 readers already, you know it’s a good book to help get your started.</p>

<p>You can <a href="https://leanpub.com/ember-cli-101">check out ‘ember 101’ here</a>.</p>

<p>I wanted to mention one other Ember book that’s now available as well called “Rock and Roll with Ember.js” by Balint Erdi. I’m actually working through this currently. Although I only recently found out about it, the first edition of the book followed Ember’s journey to its 2.0 release. As with “ember 101”, this book also guides you through building a ‘real’ application to teach you all of Ember’s concepts.</p>

<p><img src="/assets/img/rocknroll.png" alt="Rock and Roll with Ember.js" /></p>

<p>Balint made the book extremely beginner friendly, starting with the very basics such as installing ember-cli and writing your first template and works his way up in complexity. It’s also pretty fun to be working in a book to build an app that’s Rock and Roll themed.</p>

<p>“Rock and Roll with Ember.js” is also being updated constantly so it stays void of deprecation warnings and promoting practices that are no longer considered idiomatic.</p>

<p>The book is a little more expensive. There are multiple packages that start at $39, there was a discount though when the new version of the book first came out, and the price goes up from there, packaged with other materials such as access to the source code in the book and screencasts.</p>

<p><a href="http://balinterdi.com/rock-and-roll-with-emberjs/">Check out “Rock and Roll with Ember.js” here</a>.</p>

<p>Whichever material you choose to help you on your Ember journey, know that these are both great resources and won’t let you down!</p>]]></content><author><name>Tom Leskin</name><email>tleskin@gmail.com</email></author><category term="ember" /><summary type="html"><![CDATA[Learning a new concept or even a JavaScript framework can be hard. It’s even harder if the documentation isn’t that beginner friendly. Although that isn’t really the case with Ember, in my opinion, I still enjoy finding a good programming book to help teach me the concepts I need to learn and that will even help me build my first app using that new technology.]]></summary></entry><entry><title type="html">Finding records with Ember Data</title><link href="https://tleskin.github.io/blog/finding-records-with-ember-data/" rel="alternate" type="text/html" title="Finding records with Ember Data" /><published>2015-11-06T06:30:00+00:00</published><updated>2015-11-06T06:30:00+00:00</updated><id>https://tleskin.github.io/blog/finding-records-with-ember-data</id><content type="html" xml:base="https://tleskin.github.io/blog/finding-records-with-ember-data/"><![CDATA[<p>One of the concepts I didn’t completely understand when initially learning Ember
were the different methods that can be called on models to retrieve records from
the Ember Data store.</p>

<p>My initial apps only used the <code class="language-plaintext highlighter-rouge">find</code> method, which provides records of a single type, but there are others that can be used as well including <code class="language-plaintext highlighter-rouge">findAll</code> and <code class="language-plaintext highlighter-rouge">findQuery</code>. These initial apps weren’t backed by a database either so everything was loaded from fixtures and new records were destroyed upon a page refresh.</p>

<div class="language-javascript highlighter-rouge"><div class="highlight"><pre class="highlight"><code><span class="k">export</span> <span class="k">default</span> <span class="nx">Ember</span><span class="p">.</span><span class="nx">Route</span><span class="p">.</span><span class="nx">extend</span><span class="p">({</span>
  <span class="na">model</span><span class="p">:</span> <span class="kd">function</span> <span class="p">(</span><span class="nx">params</span><span class="p">)</span> <span class="p">{</span>
    <span class="k">return</span> <span class="k">this</span><span class="p">.</span><span class="nx">store</span><span class="p">.</span><span class="nx">find</span><span class="p">(</span><span class="dl">'</span><span class="s1">recipe</span><span class="dl">'</span><span class="p">,</span> <span class="nx">params</span><span class="p">.</span><span class="nx">recipe_id</span><span class="p">);</span>
  <span class="p">}</span>
<span class="p">});</span>
</code></pre></div></div>

<p>In a recent app, it was connected to a Rails API and was using the <code class="language-plaintext highlighter-rouge">findQuery</code> method to retrieve records from the Ember Data store. I didn’t write the initial code, I was only adding features to the app, so I wasn’t familiar with <code class="language-plaintext highlighter-rouge">findQuery</code>. In adding features to the app, I created a form to add new records and a function in my controller that would grab the data from the form and save the new record. I ran into one problem though. Although my Ember app was making a POST request to the Rails backend to save the record to the database, the DOM was not automatically updating with the new record.</p>

<div class="language-javascript highlighter-rouge"><div class="highlight"><pre class="highlight"><code><span class="c1">// In my model:</span>
<span class="nx">model</span><span class="p">:</span> <span class="kd">function</span><span class="p">(</span><span class="nx">params</span><span class="p">)</span> <span class="p">{</span>
  <span class="k">return</span> <span class="k">this</span><span class="p">.</span><span class="nx">store</span><span class="p">.</span><span class="nx">findQuery</span><span class="p">(</span><span class="dl">'</span><span class="s1">memory</span><span class="dl">'</span><span class="p">,</span> <span class="nx">params</span><span class="p">);</span>
<span class="p">}</span>

<span class="c1">// In my controller:</span>
<span class="nl">addNewMoment</span><span class="p">:</span> <span class="kd">function</span> <span class="p">()</span> <span class="p">{</span>
      <span class="kd">let</span> <span class="nx">moment</span> <span class="o">=</span> <span class="k">this</span><span class="p">.</span><span class="nx">getProperties</span><span class="p">(</span><span class="dl">'</span><span class="s1">caption</span><span class="dl">'</span><span class="p">,</span> <span class="dl">'</span><span class="s1">content</span><span class="dl">'</span><span class="p">,</span> <span class="dl">'</span><span class="s1">location</span><span class="dl">'</span><span class="p">,</span> <span class="dl">'</span><span class="s1">happenedAt</span><span class="dl">'</span><span class="p">);</span>
      <span class="k">this</span><span class="p">.</span><span class="nx">store</span><span class="p">.</span><span class="nx">createRecord</span><span class="p">(</span><span class="dl">'</span><span class="s1">moment</span><span class="dl">'</span><span class="p">,</span> <span class="nx">moment</span><span class="p">).</span><span class="nx">save</span><span class="p">();</span>
    <span class="p">}</span>
</code></pre></div></div>

<p>I felt like I had tried everything and couldn’t figure out why the record was saving to the database, but wasn’t updating on the front-end in my Ember app. It turns out the reason why my record wasn’t saving was because of the <code class="language-plaintext highlighter-rouge">findQuery</code> method in my model.</p>

<p>If you use the <code class="language-plaintext highlighter-rouge">findQuery</code> method, it puts the job of filtering on the server’s back. Ember Data assumes that the results that were returned initially are the only results that are associated with that collection, so it will only make the call to the database once. In this case, you can manually push a new record into a collection of records using <code class="language-plaintext highlighter-rouge">pushObject</code>.”</p>

<div class="language-javascript highlighter-rouge"><div class="highlight"><pre class="highlight"><code>  <span class="c1">// If using findQuery, something like this</span>
  <span class="c1">// will push the new record into the collection:</span>
  <span class="kd">var</span> <span class="nx">model</span> <span class="o">=</span> <span class="k">this</span><span class="p">.</span><span class="kd">get</span><span class="p">(</span><span class="dl">'</span><span class="s1">model</span><span class="dl">'</span><span class="p">);</span>
  <span class="nx">model</span><span class="p">.</span><span class="nx">pushObject</span><span class="p">(</span><span class="nx">moment</span><span class="p">);</span>
</code></pre></div></div>

<p>This is when I realized that I needed to pay closer attention to the methods that I was calling in my models and started to learn what all the different ones will do for you.</p>

<p>Basically, <code class="language-plaintext highlighter-rouge">findAll</code> will return all the records of a specific type and will trigger a request to the server, <code class="language-plaintext highlighter-rouge">all</code> is essentially the same, but uses the cache, so if you have records in your store, no request will be made, <code class="language-plaintext highlighter-rouge">findById</code> returns a single object and as we discussed earlier, <code class="language-plaintext highlighter-rouge">findQuery</code> will return a subset from your server.</p>

<p>Here’s <a href="https://github.com/emberjs/data/blob/master/packages/ember-data/lib/system/store.js#L431">a bit more information</a> in the Ember source code.</p>

<p>I hope this was helpful for other Ember beginners learning the framework.</p>]]></content><author><name>Tom Leskin</name><email>tleskin@gmail.com</email></author><category term="ember" /><summary type="html"><![CDATA[One of the concepts I didn’t completely understand when initially learning Ember were the different methods that can be called on models to retrieve records from the Ember Data store.]]></summary></entry><entry><title type="html">Building ambitious Ember apps is easy with Ember CLI</title><link href="https://tleskin.github.io/blog/intro-to-ember-cli/" rel="alternate" type="text/html" title="Building ambitious Ember apps is easy with Ember CLI" /><published>2015-11-03T22:15:00+00:00</published><updated>2015-11-03T22:15:00+00:00</updated><id>https://tleskin.github.io/blog/intro-to-ember-cli</id><content type="html" xml:base="https://tleskin.github.io/blog/intro-to-ember-cli/"><![CDATA[<p>Coming from the world of Ruby and Rails, learning JavaScript seemed a daunting
task, especially when it came to learning things like <a href="https://developer.mozilla.org/en-US/docs/Web/JavaScript/Reference/Operators/this">this</a> or what it means
to <a href="https://developer.mozilla.org/en-US/docs/Web/JavaScript/Reference/Global_Objects/Function/bind">bind</a>. Luckily, I had a <a href="https://twitter.com/stevekinney/status/551400389749141505">great JavaScript instructor</a> who was especially helpful when I decided to learn Ember.</p>

<p><img src="/assets/img/build_with_ember.png" alt="Building with Ember" class="center-image" /></p>

<p>There are many tutorials on the web to help teach you Ember like the <a href="https://www.codeschool.com/courses/warming-up-with-ember-js">one on Code School</a>, but those that are sightly outdated, like the Code School one, won’t teach you to develop Ember apps with the Ember CLI, a command line interface for “ambitious web applications” and the generally accepted way to create Ember apps today.</p>

<p>Although Ember is written in JavaScript, I found it easy to understand much about how the framework worked because of similarities it shared with Rails, especially with the CLI.</p>

<p>Before we dive into the Ember CLI, I think it’s good to take a step back and ask what is Ember, just so we’re all on the same page. For those that aren’t familiar, Ember.js is a client-side JavaScript MVC Framework that provides bindings, observers, adapters, such as the RESTAdapter or ActiveModelAdapter, etc. Ember CLI on the other hand is a Rails-like helper for building Ember.js apps that provides a development server and build tools, generators, testing by default and add-ons.</p>

<p>There’s a lot that we can talk about with Ember CLI, but besides telling you how to get started with it, I’m going to focus on three main things: generators, testing and addons.</p>

<h4 id="getting-started--generators">Getting Started + generators</h4>

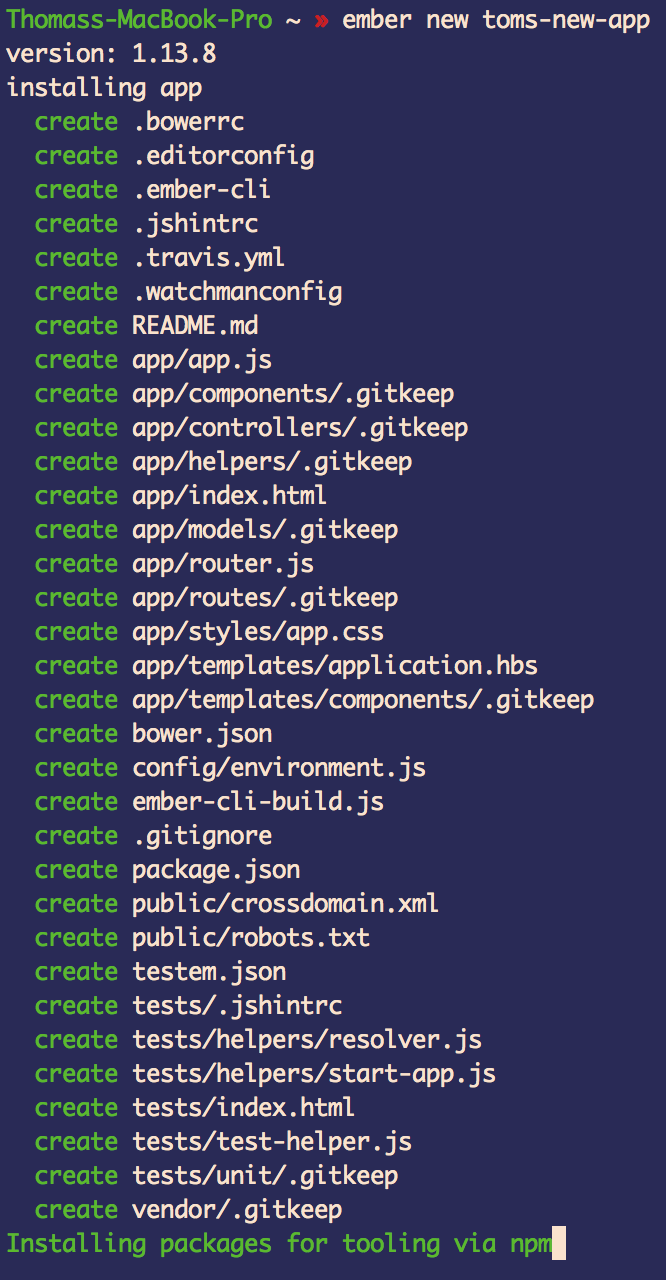
<p>To install Ember CLI, as long as you have <a href="https://www.npmjs.com/">npm</a> (Node Package Manager) and <a href="nodejs.org">NodeJS</a> installed on your machine, all you need to do is run the command ‘npm install -g ember-cli. This may take a little while to install Ember CLI and Ember, which is just a NodeJS package, but once installed, we can immediately begin a new project by running ‘ember new my-great-app’, ‘ember new’ plus the name of our app/project.</p>

<p>For help installing, the Ember website has a <a href="http://guides.emberjs.com/v2.1.0/getting-started/">tutorial</a>, plus has <a href="http://guides.emberjs.com/v2.1.0/getting-started/first-app/">another tutorial</a> to help you build your first Ember app.</p>

<p><img src="/assets/img/ember-new.png" alt="New Ember project" class="center-image" /></p>

<p>By running the ‘ember new’ command, we create a new project directory with different folders and files and install any packages or dependencies needed via npm. The great thing about this is that if you’ve seen a NodeJS app before and/or a Rails app, you have an idea of the layout and where things should be located. For example, in the app folder, you have additional folders and files for your components, controllers, models, routes and templates, etc.</p>

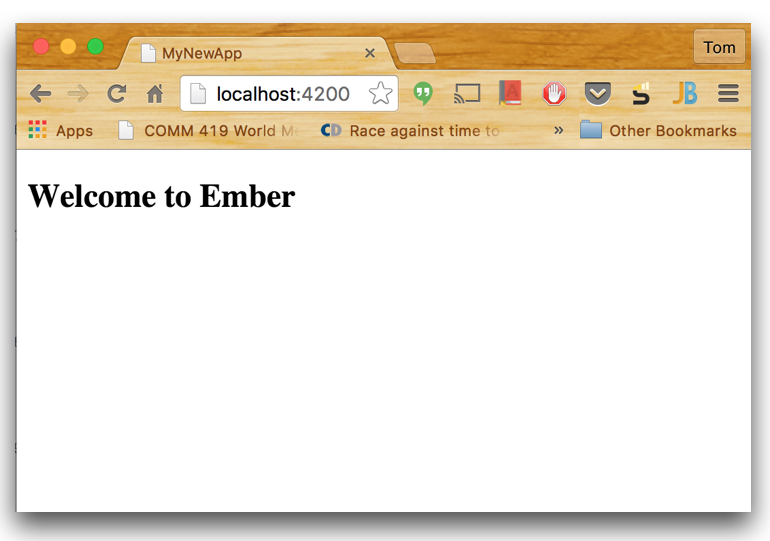
<p>Believe it or not, just by running this simple ‘ember new’ command, we already have a working Ember app even though it’s extremely simple and doesn’t do much. If we run ‘ember s’ or ‘ember server’, our app will be built and served to localhost:4200.</p>

<p><img src="/assets/img/ember-s.png" alt="Build Ember app" class="center-image" /></p>

<p>Now that we have our new app, we can start building it out and make use of Ember CLI’s generators. The generators in Ember CLI are very much Rails-like and can generate nearly anything including models, routes, controllers, components, adapters, tests… you name it.</p>

<p>To generate these, you just run ‘ember g’ followed by the type of thing and then the name of it. Here are some examples: ‘ember g model user’, ‘ember g resource album’ and ‘ember generate component email-component’.</p>

<p>One last thing that’s really awesome about generators, which will take us into the next topic, is that when you do generate something it will also create a test for you to test that new thing you generated.</p>

<h4 id="testing">Testing</h4>

<p>Another thing that Ember takes from the Ruby/Rails world, is the ability to let you easily write well-tested code by including QUnit as the default testing library. If you aren’t a fan of QUnit, that’s okay since others are supported
through third-party addons.</p>

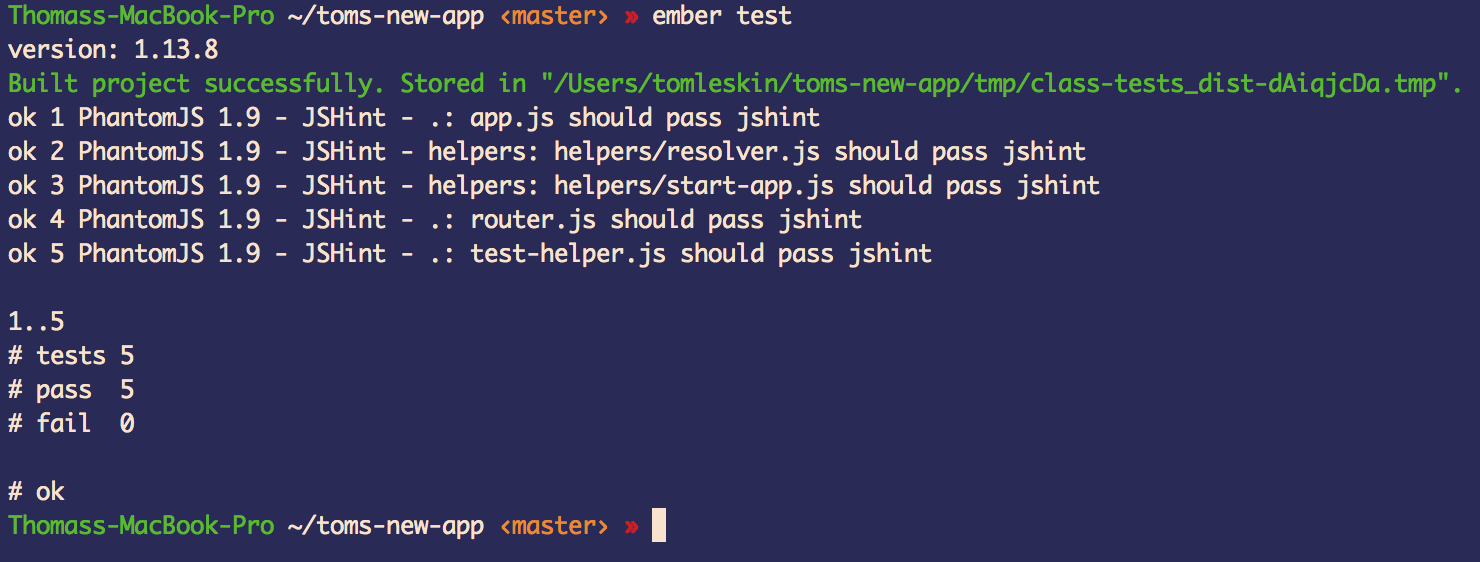
<p>To run your tests, just run ‘ember test’ from your command line and the tests will be run and you can see the results right there. You can also re-run your tests on every file-change by running ‘ember test –server’ from the command line. These commands run your tests using Testem to make testing multiple browsers very easy. You can configure Testem using the testem.json file in your application root.</p>

<p><img src="/assets/img/testing.png" alt="Testing" class="center-image" /></p>

<p>If you have your app built and served to a local server, you can just visit ‘http://localhost:4200/tests’ and view your tests in the browser.</p>

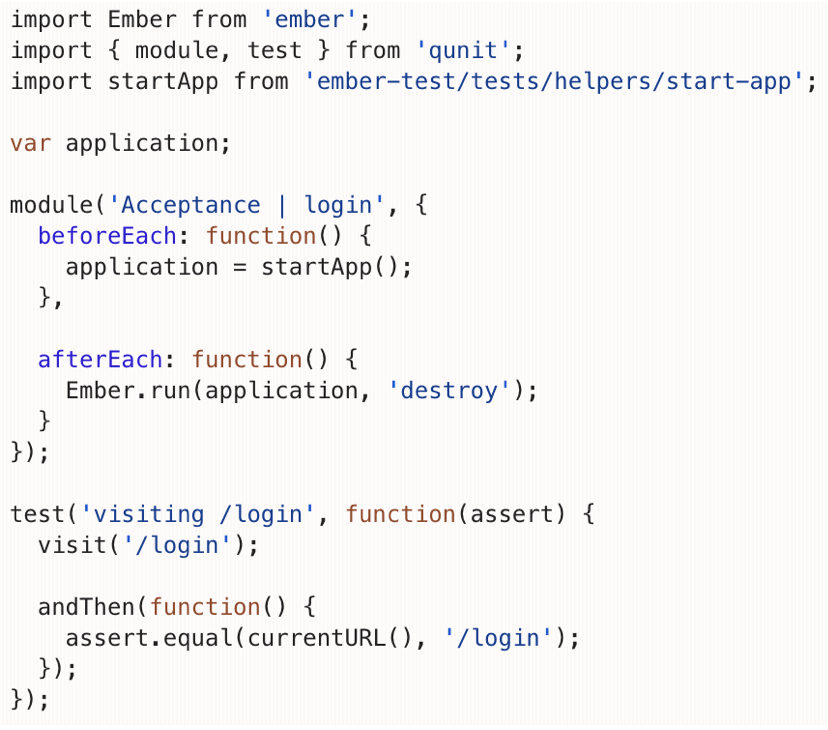
<p>One last thing to mention is that while using generators to generate code such as models or controllers will create tests for you, you can also generate your own tests such as an acceptance-test by running  ‘ember generate acceptance-test’ then the name of the test. For example, here’s how I would create an acceptance-test testing login, ‘ember g acceptance-test login’, plus the test it generates.</p>

<p><img src="/assets/img/acceptance-test.png" alt="Acceptance test" class="center-image" /></p>

<h4 id="addons">Addons</h4>

<p>The last thing I’d like to touch on with the Ember CLI are addons. This is a system that provides a way to create reusable units of code. You can think of them as similar to RubyGems.</p>

<p>Basically, if someone has already created code for something that is done by many, why should you have to reinvent the wheel?</p>

<p>Addons are installed by running ‘ember install <name>' and some addons that you could potentially add to your project could be 'ember-cli-materialize' to add a CSS framework for styling based off of Google's Material Design or 'ember-g-map', a simple way to integrate with Google Maps in your Ember app. One that I've used in the past was called 'ember-cli-showdown' that transforms Markdown into HTML, since our text wasn't styling correctly for one project.</name></p>

<h4 id="conclusion">Conclusion</h4>

<p>Although you can create Ember apps without the CLI, that’s how you have to do it if you were creating an Angular.js or Backbone.js app, this is just a tool that really simplifies things and gives you a lot of things for free.</p>

<p>The Ember CLI was created so you can stop wasting time with little things such as file structure or how exactly do I setup this code and lets you get to the more important and challenging things. Also, if everyone is using it and the projects all have the same file structure, any Ember developer can jump into the app and know where things are located.</p>

<p>To reiterate, the reason why you’d want to consider the Ember CLI is that it’s considered a best practice to use it to build an Ember app, it comes with generators to easily create boilerplate code, it has a built-in testing library and has lots of addons for reusable code already created by the community.</p>]]></content><author><name>Tom Leskin</name><email>tleskin@gmail.com</email></author><category term="ember" /><summary type="html"><![CDATA[Coming from the world of Ruby and Rails, learning JavaScript seemed a daunting task, especially when it came to learning things like this or what it means to bind. Luckily, I had a great JavaScript instructor who was especially helpful when I decided to learn Ember.]]></summary></entry><entry><title type="html">Learning how to learn, hacking at Pebble Rocks Boulder</title><link href="https://tleskin.github.io/blog/learning-how-to-learn/" rel="alternate" type="text/html" title="Learning how to learn, hacking at Pebble Rocks Boulder" /><published>2015-09-08T12:28:00+00:00</published><updated>2015-09-08T12:28:00+00:00</updated><id>https://tleskin.github.io/blog/learning-how-to-learn</id><content type="html" xml:base="https://tleskin.github.io/blog/learning-how-to-learn/"><![CDATA[<p>If someone had asked me seven months ago what I thought the most valuable thing was
that I’d be learning at the Turing School of Software &amp; Design, I probably would have answered either Ruby, Rails or Test Driven Development. With my cohort 1502 having graduated a few weeks ago, it got me thinking and to me, it seems the most valuable skill I picked up during my time at Turing was to learn
how to learn.</p>

<p>“Learning how to learn” is something that I’ve heard many times and didn’t fully understand until recently. Over the course of the seven months at Turing it’s almost like high school all over again, but super condensed. When you’re in Module 1, you’re almost like a freshman, not knowing that much and basically being given lessons and assignments where you’re hand is being held a bit. As you make your way up through the program, you gain more and more experience and confidence, but also more responsibility. Starting in Module 3 and continuing into Module 4 and now real life, our learning became our own responsibility. We were taught that if we wanted to succeed in the engineering world, we needed to be able to take control of our own learning and possess the ability to constantly teach ourselves new skills. The program at Turing primarily teaches Ruby, Rails and JavaScript among many other things, but if you aren’t open to learning new skills or trying different languages, you won’t succeed because the industry never slows down or settles on one technology. Plus, you won’t always have someone to stand in front you to in a classroom setting telling you exactly what you have to do.</p>

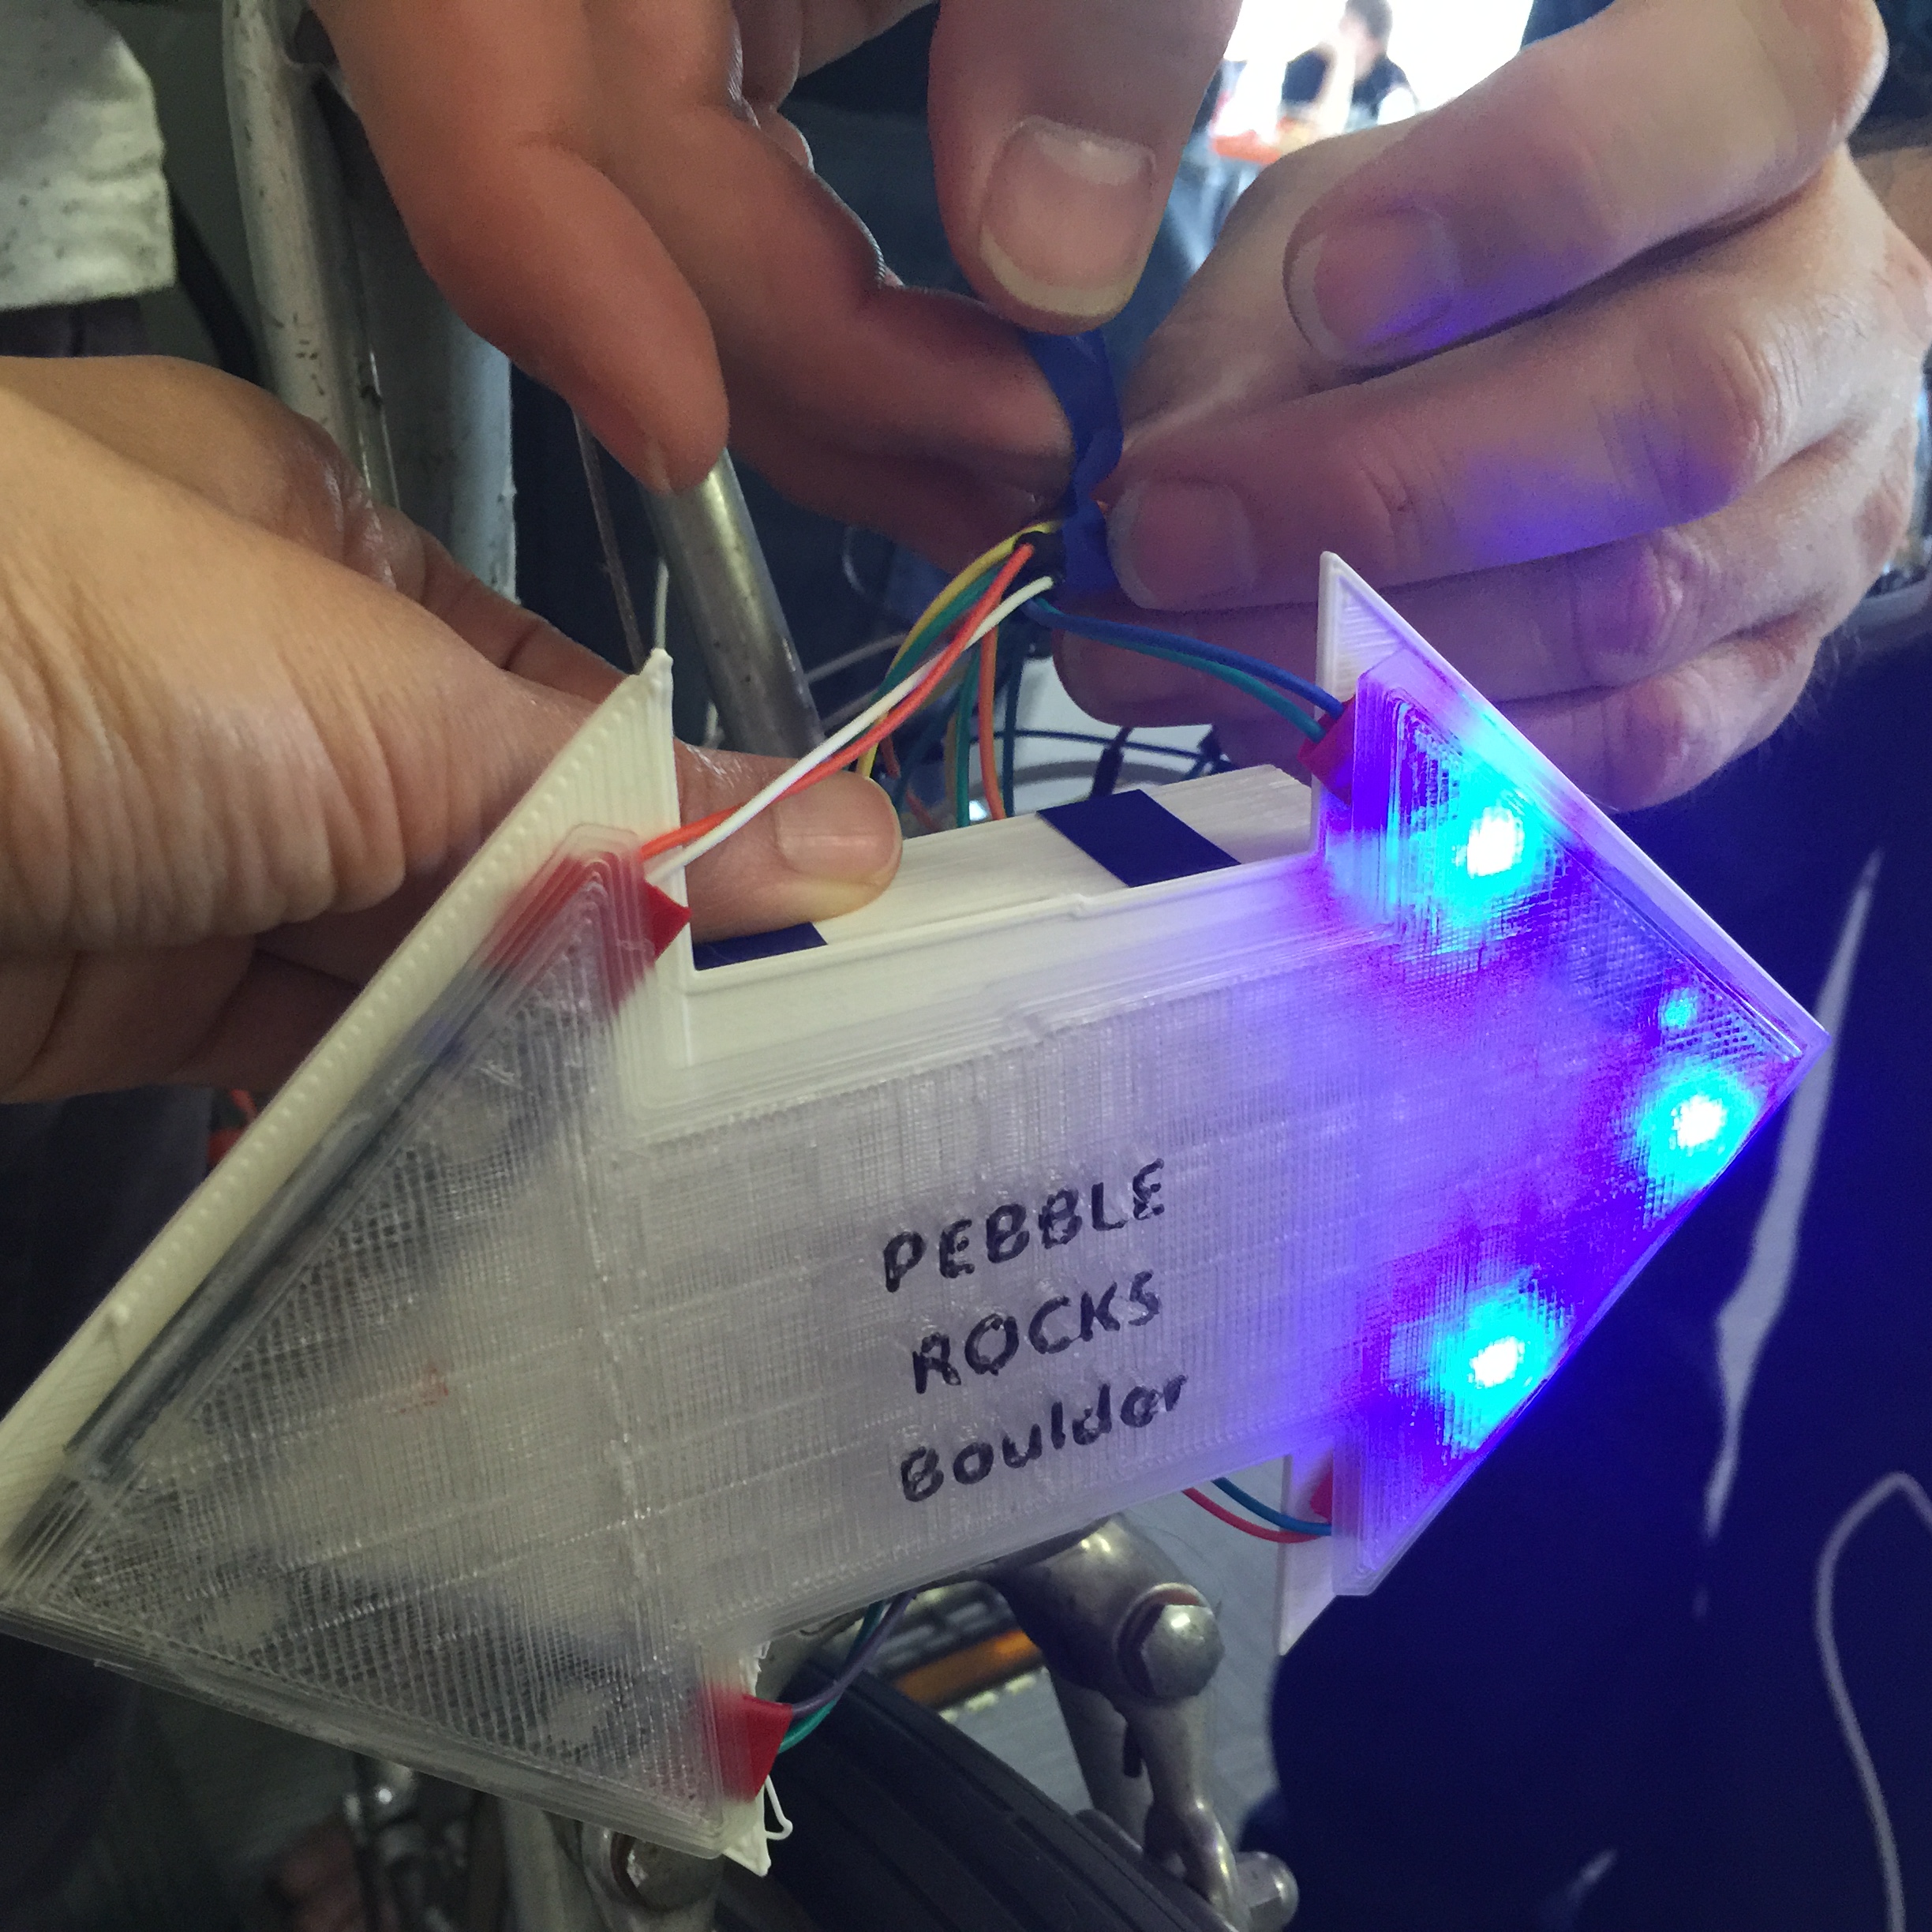
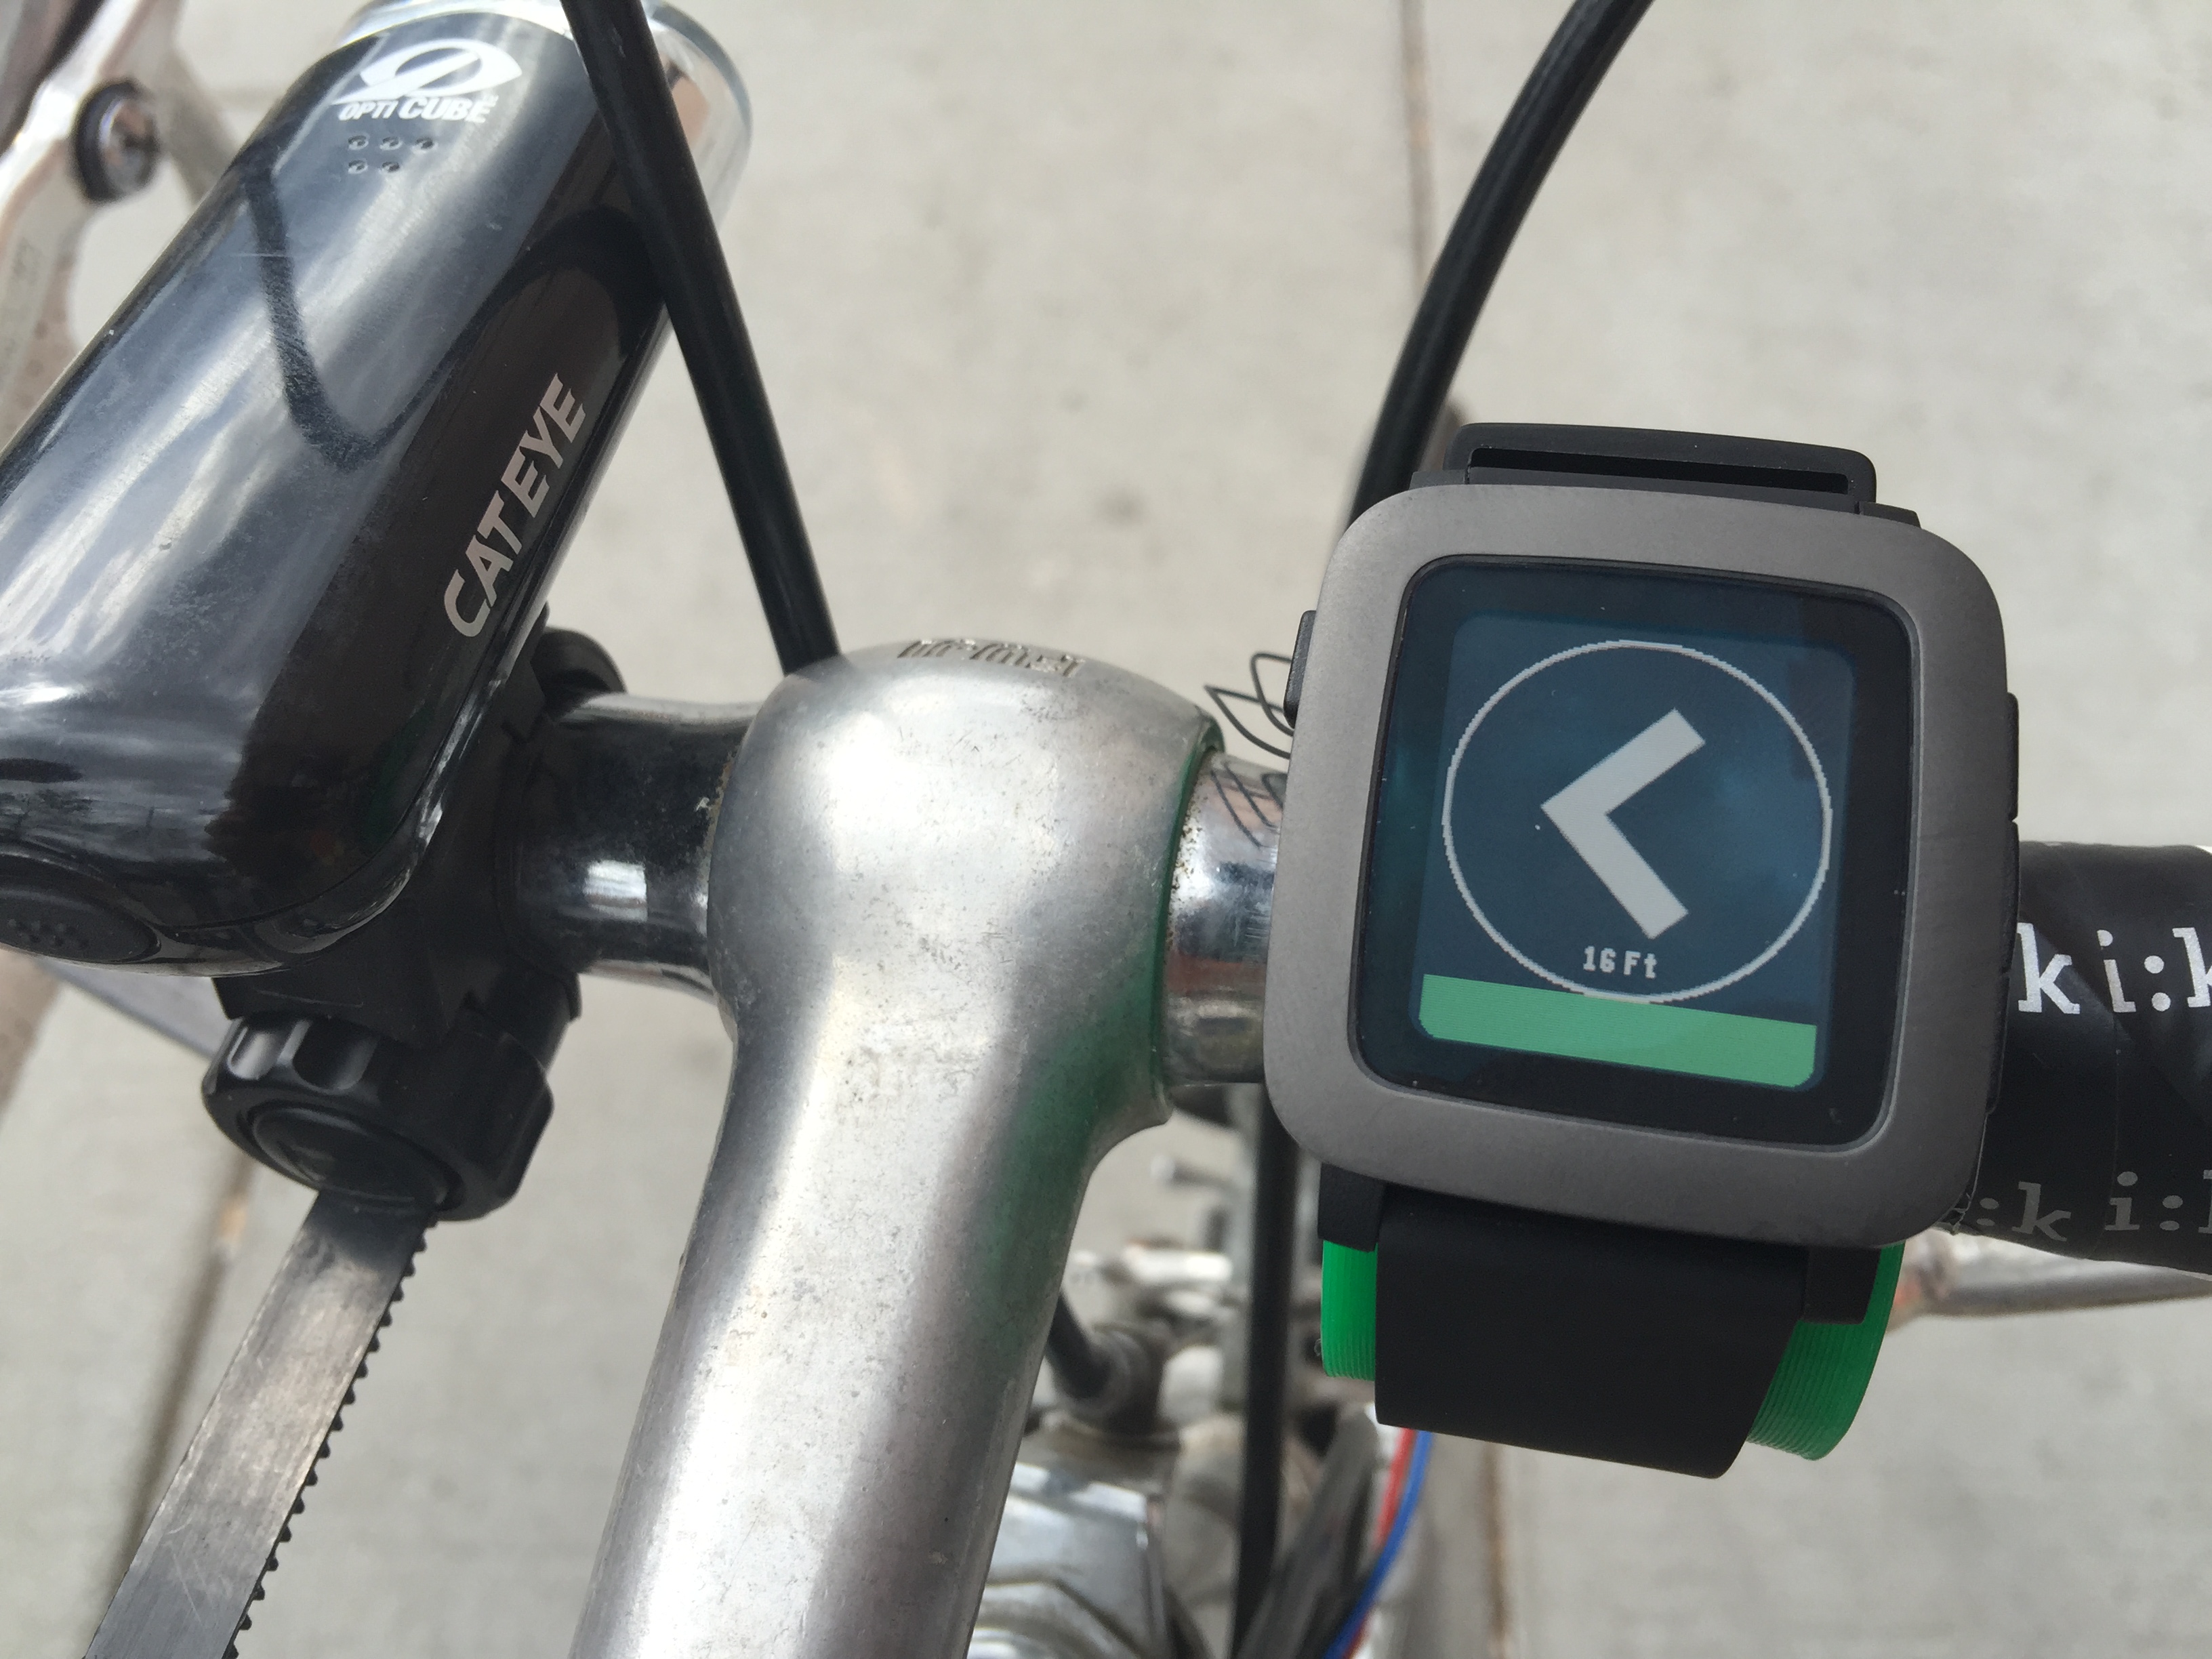
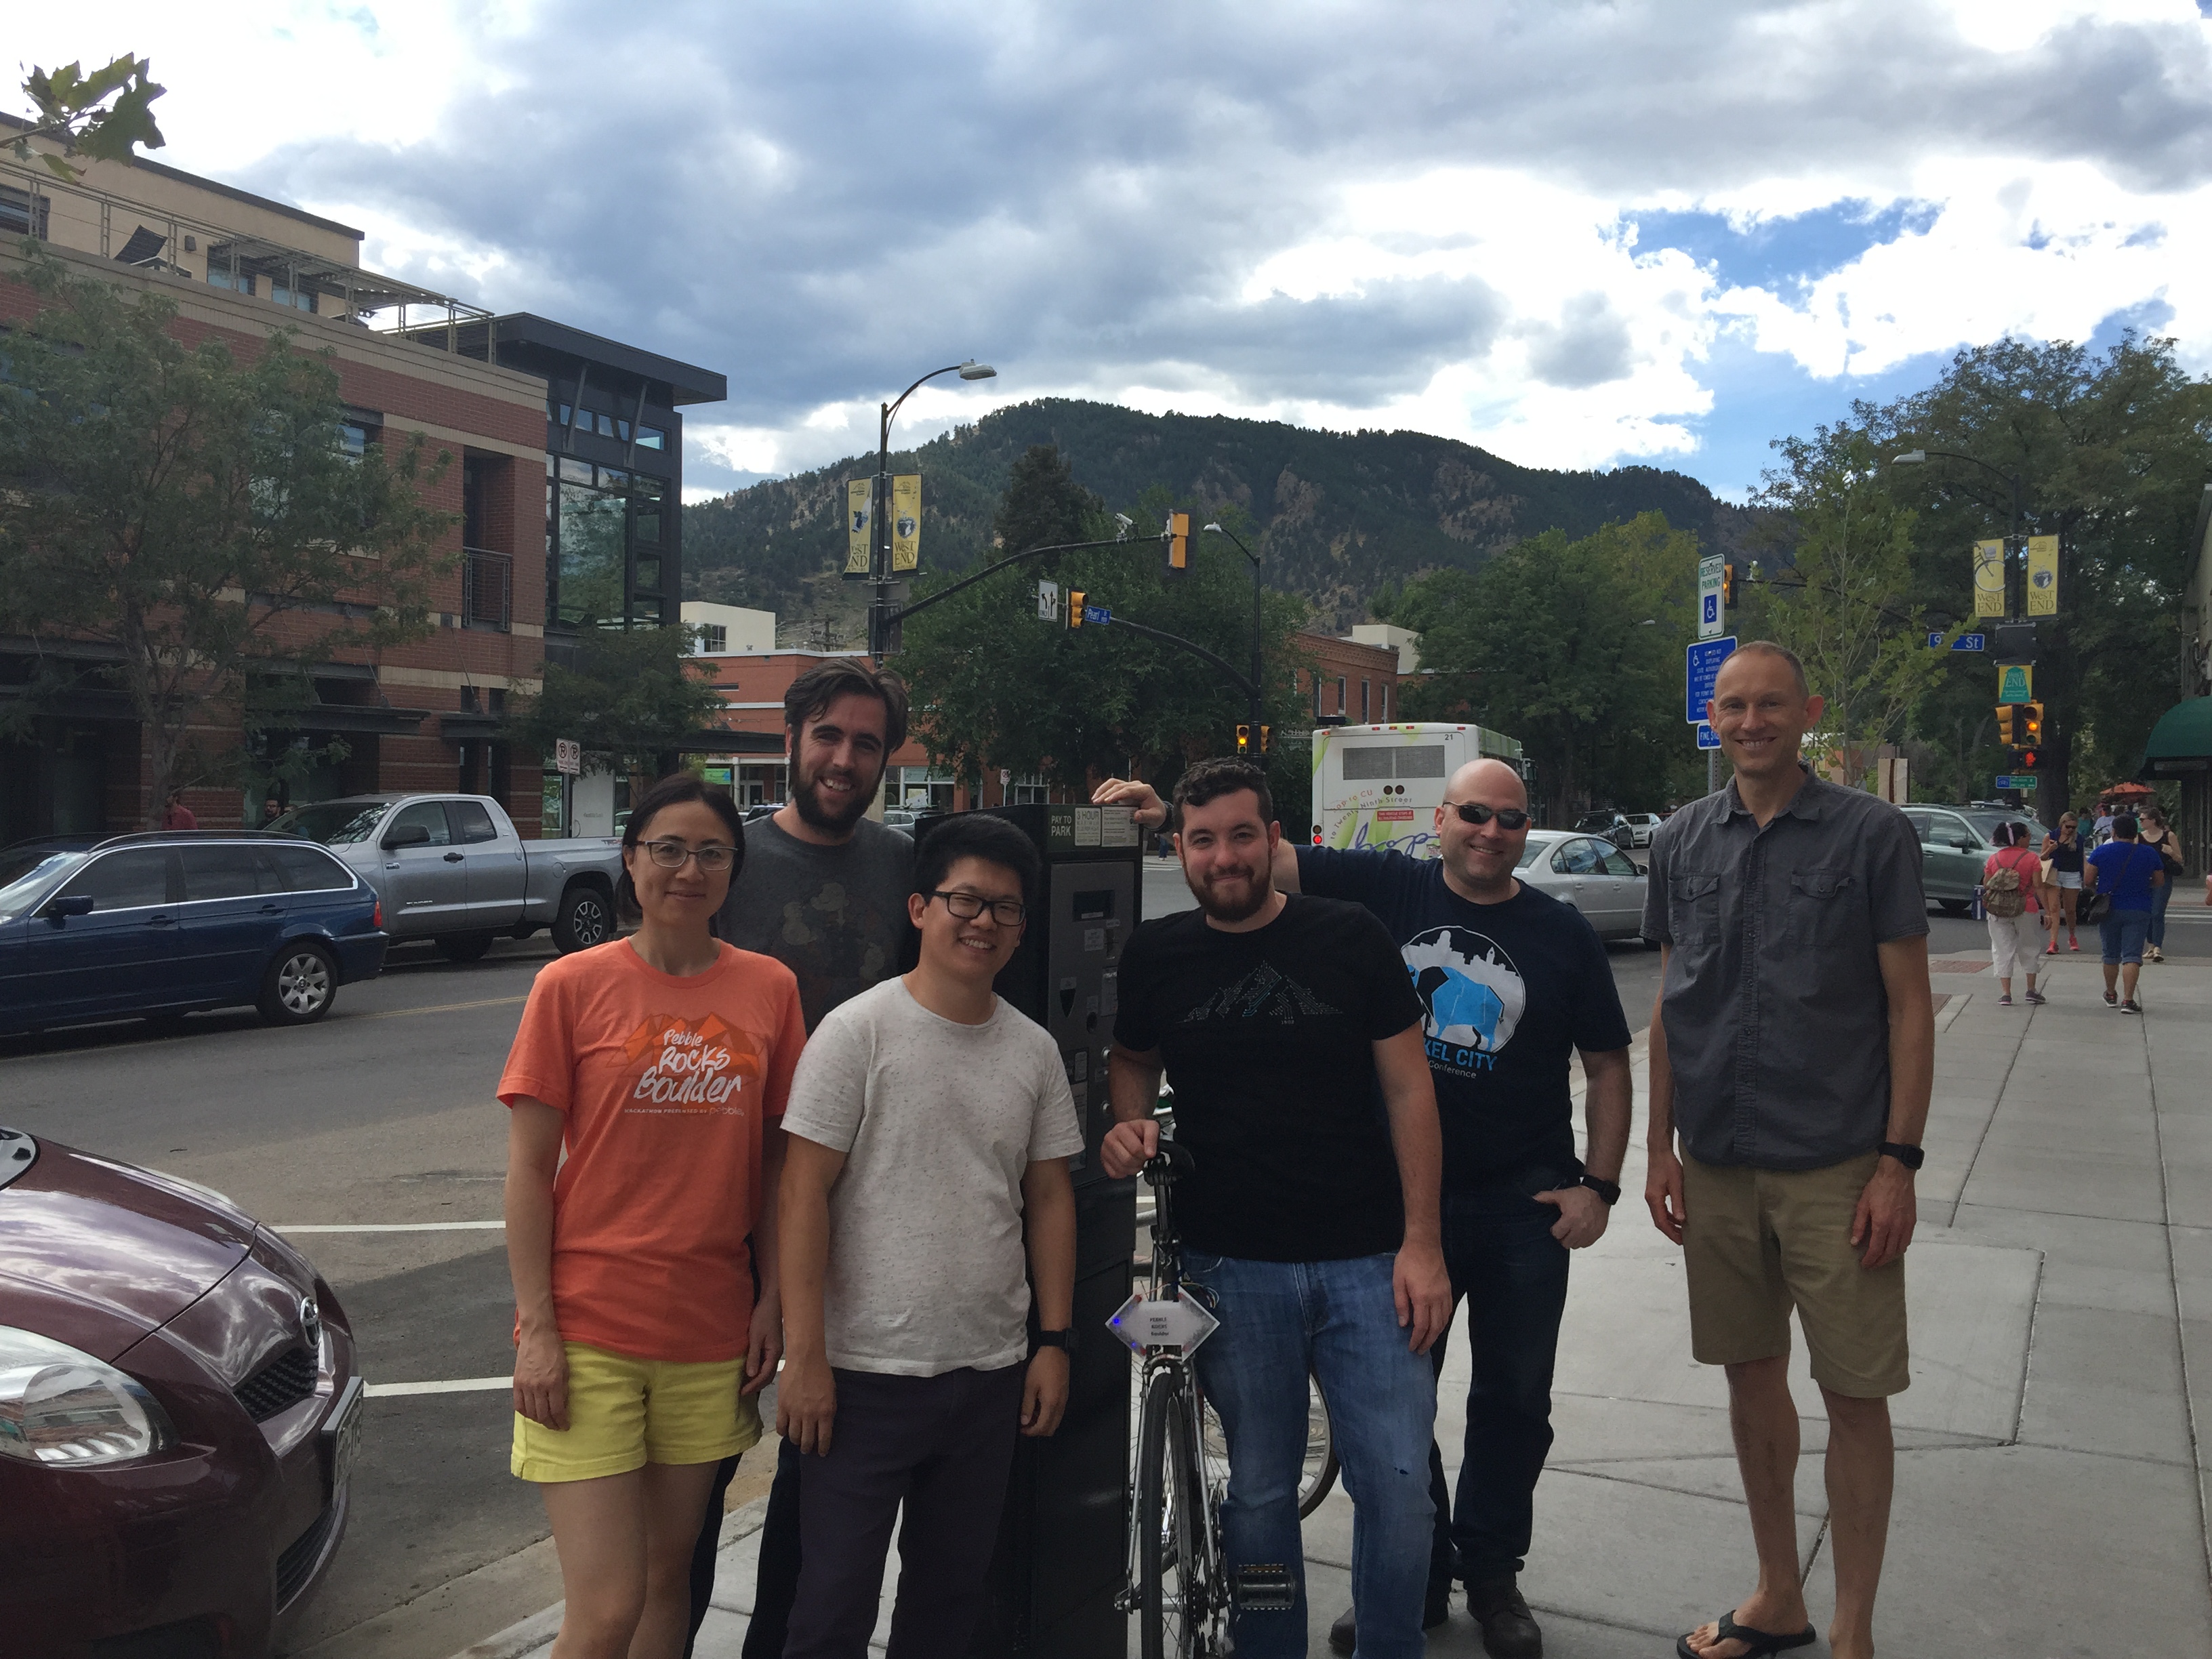
<p>The place where I saw these skills coming into play the most were this past weekend when I participated in the <a href="http://www.pebblerocksboulder.com">Pebble Rocks Boulder</a> hackathon with several other Turing students and alumni as well as another engineer who works locally in Boulder. PRB was a 48-hour hackathon held at Galvanize Boulder where teams had to come up with an idea and implement it. They were encouraged to hack hardware using Pebble Time smartwatches, newly-released smartstraps, arduinos and more, as well as create software to accompany it and use 3D printers to create anything else needed. After deliberating for a long time, our team settled on a project that we ended up calling <a href="https://www.hackster.io/teamturing/turnakit">TurnaKit</a>. Although we worked iteratively, we ended up with smart turn signals for your bicycle. We developed two smartwatch apps, one that could allow you to turn on the signals manually from the Pebble Time once it was connected to the dock on the bicycle and another that once a destination was set, it would provide turn-by-turn directions for the rider as well as automatically turn on the turn signals within 50 feet of a turn.</p>

<p>We came into the hackathon thinking we knew some JavaScript and would be fine since the Pebble development team allows you to write apps in either C or JavaScript, but it ended up that to be able to write apps that interact with the new smartstrap hardware, you had to use C. My education at Turing allowed me to be able to follow the documentation and provided tutorials to write the code required by our project. This was the first time I ever wrote C code, but we ended up with completely working hardware and software. It was a challenge, but one I was fully prepared to tackle. We didn’t end up winning, but we were finalists in the top 8 out of 22. There were more teams originally since there were 75+ developers that started, but only 22 had a finished project.</p>

<p>I think this just proves that as a developer, you never know what you’ll be doing from day to day, but if you can think logically and know how to learn and constantly teach yourself new skills, you will always be successful.</p>

<p><img src="/assets/img/prb1.JPG" alt="TurnaKit arduino-controlled LED light." /></p>

<p><img src="/assets/img/prb2.JPG" alt="TurnaKit light running on Pebble Time." /></p>

<p><img src="/assets/img/prb3.JPG" alt="Team Turing at Pebble Rocks Boulder." /></p>]]></content><author><name>Tom Leskin</name><email>tleskin@gmail.com</email></author><category term="coding" /><summary type="html"><![CDATA[If someone had asked me seven months ago what I thought the most valuable thing was that I’d be learning at the Turing School of Software &amp; Design, I probably would have answered either Ruby, Rails or Test Driven Development. With my cohort 1502 having graduated a few weeks ago, it got me thinking and to me, it seems the most valuable skill I picked up during my time at Turing was to learn how to learn.]]></summary></entry><entry><title type="html">Exploring the MEAN Stack</title><link href="https://tleskin.github.io/blog/exploring-the-mean-stack/" rel="alternate" type="text/html" title="Exploring the MEAN Stack" /><published>2015-06-26T12:31:00+00:00</published><updated>2015-06-26T12:31:00+00:00</updated><id>https://tleskin.github.io/blog/exploring-the-mean-stack</id><content type="html" xml:base="https://tleskin.github.io/blog/exploring-the-mean-stack/"><![CDATA[<p>One of the things that I love about <a href="http://www.turing.io/">Turing</a> is the fact that the program and its instructors try to turn us into extremely diverse developers. One way they do that is by requiring us to do a Lightning Talk once a module after you complete Module 1. While your first talk in Module 2 doesn’t have to be technical and can be about any topic you like, such as your career before software development, the others that follow should be something coding or technology related.</p>

<p>Since we’re always so busy with classwork and don’t usually have time for much else, I’ve been using my Lightning Talks as an opportunity to explore topics that I find interesting, but usually don’t have the time to.</p>

<p>My talk was originally shared over at the Turing’s blog. Here’s my description from the school’s blog:</p>

<blockquote> At Turing, students are taught to become diverse developers who are able to think logically and can use any programming language as a tool to solve a problem. In my Module 3 Lightning Talk, I chose to explore the MEAN Stack. The MEAN Stack is made up of four frameworks: MongoDB, ExpressJS, AngularJS and Node.js. It uses a single language across the entire stack and has been said to increase productivity. I realize that I may not be programming in Ruby and Rails after Turing, so I wanted to explore other frameworks and drive deeper into JavaScript.
</blockquote>

<p>My screencast/presentation is also over on Turing’s Vimeo channel, but to make it easier, here it is:</p>

<iframe src="https://player.vimeo.com/video/131476026" width="500" height="313" frameborder="0" webkitallowfullscreen="" mozallowfullscreen="" allowfullscreen=""></iframe>
<p><a href="https://vimeo.com/131476026">Exploring the MEAN Stack -- Tom Leskin</a> from <a href="https://vimeo.com/turing">Turing School</a> on <a href="https://vimeo.com">Vimeo</a>.</p>

<p>Slides from my talk can be viewed <a href="http://tleskin.github.io/exploring-mean-stack/">here</a>.</p>

<p>If you have any questions feel free to drop be a line. Thanks!</p>]]></content><author><name>Tom Leskin</name><email>tleskin@gmail.com</email></author><category term="coding" /><summary type="html"><![CDATA[One of the things that I love about Turing is the fact that the program and its instructors try to turn us into extremely diverse developers. One way they do that is by requiring us to do a Lightning Talk once a module after you complete Module 1. While your first talk in Module 2 doesn’t have to be technical and can be about any topic you like, such as your career before software development, the others that follow should be something coding or technology related.]]></summary></entry><entry><title type="html">Tickling funny bones at the Quick Left Humor Hackfest 2015</title><link href="https://tleskin.github.io/blog/humor-hackfest/" rel="alternate" type="text/html" title="Tickling funny bones at the Quick Left Humor Hackfest 2015" /><published>2015-06-25T05:45:00+00:00</published><updated>2015-06-25T05:45:00+00:00</updated><id>https://tleskin.github.io/blog/humor-hackfest</id><content type="html" xml:base="https://tleskin.github.io/blog/humor-hackfest/"><![CDATA[<p>Being a student at <a href="http://www.turing.io/">Turing</a> can be a roller coaster of a time for seven months. You have practically no free time to do anything else, hence why I’m writing this blog post about a month and a half late. You experience ups and downs, times when you feel like the best programmer in the world and other times you’re doubting yourself and thinking this probably isn’t for me. In my experience though, all the hard work pays off and you eventually get to a break between the six week modules, known as an intermission week.</p>

<p>Although these weeks are somewhat breaks, the burner is turned down only slightly and you still have pre-work for the next module to complete. During the last intermission week, it was lucky enough to fall on the same week as Boulder Startup Week 2015. For a student who will now be graduating in about 7 weeks (including the intermission week), this couldn’t have fallen on a better time. It was perfect to try to get involved in the local startup community as well as to do some networking.</p>

<p>There were numerous events during BSW, but the one that sticks out in my mind the most was the Humor Hackfest hosted by Quick Left, a software consultancy on Pearl Street in Boulder.</p>

<p>It was the first time I had ever participated in such an event so I was both excited and nervous. If you’re unfamiliar with what a hackfest is, it’s not an event where you’re trying to do something like hack the government, like you hear in the news involving China and the U.S., but an event where you’re given a limited amount of time to try to “hack” together some kind of working app. In the case of the Humor Hackfest at QL, you were given about three hours to build an app around the theme “humor” or as the event description said, “create products — tech or otherwise — that help people learn and practice how to be funnier, thus enriching their lives and the lives of people around them.” The only real strict rules were that you couldn’t have built it before the event and it had to “work”, so you needed to be able to present a working app.</p>

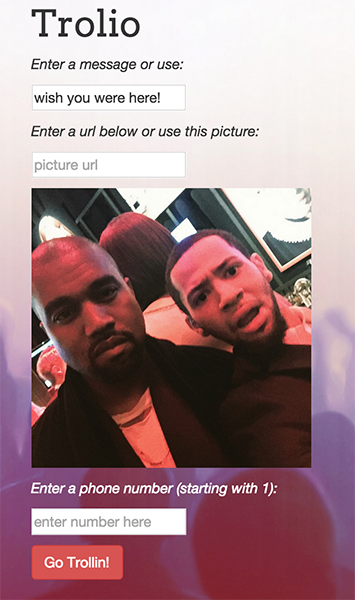
<p>Before the hackfest, I had been excited for the event for weeks and even started recruiting a team before hand, which ended up being my friends and fellow Turing students Eric Dowty and Patrick Medaugh, but we had no idea what we were doing to build. One of the ideas vetoed was an app that lets you receive emails from your favorite celebrities, such as Taylor Swift, who surprisingly some people people at Turing are obsessed with. We settled on an app that we called Trolio that let you spam your friends with random MMS messages.</p>

<p><img src="/assets/img/trolio.png" alt="Trolio" /></p>

<p>The thought behind Trolio was that just about everyone gets random texts from time to time from someone they don’t know. Eric came up with the idea, which a lot of people really enjoyed and thought was pretty funny, where you could go to our app, enter a message, which we provided the default ‘wish you were here!’, enter a URL to an image, again a random default one is provided, then you enter a phone number and your friend (or person you’re trolling) will receive a text with all of that information from a random rural Colorado phone number.</p>

<p>During the event we did our best to code as quickly and efficiently as possible, mostly working in pairs (yes, we do lots of pair programming at Turing). As soon as Rachel Scott from QL yelled “go!” after everyone got pizza and beer for dinner, it was a mad dash to your work area. I just remember it being a whirlwind to get started and also feeling the pressure of only having three hours to build our app. The advantage to pairing was that we had who brains what could write code twice as fast, that was also much cleaner.</p>

<p>The three of us had just come out of Module 2 at Turing, so our Rails skills were just starting to really develop, but we felt comfortable enough to be able to create a new project and implement what we wanted. One of the most challenging parts was one of the most crucial pieces of our app, integrating the Twilio API, which allows your app to make and receive phone calls and send and receive text messages. We had never used an API before, we actually just got really deep into using third-party APIs in the past six weeks at Turing in Module 3, but it only took us less than an hour to get it all hooked up.</p>

<p>As the time went on, we had our app mostly finished in about an hour and a half. A lot of the time afterwards was spent trying to get some CSS styling and to add additional features, but the most challenging thing was that we wanted to have an app in production so that people could use and visit our app even afterwards. With electronic music blasting in the background and time running thin, we tried everything and eventually got our app pushed to Heroku at the last minute. I can’t remember what the issue was that were having, but thanks to some help from other fellow Turing students, we got it sorted out.</p>

<p>In the end, we got to present our app and although we didn’t win, people did seem to love it. I remember reading on Twitter how someone mentioned our app was their favorite out of all the presentations so far. It also seemed to be the most favorited and retweeted out of all the apps.</p>

<p><img src="/assets/img/hackfest.png" alt="Group" /></p>

<p>Even before attending the Humor Hackfest, I got some advice from a Turing graduate that I should try to participate in as many ‘hack-a-thons’ as possible since it looks good to employers and many look for new employees at these sort of events. While that’s probably true, I think participating in such an event shows that you’re able to come up with an idea and put together some sort of implementation quickly. For anyone studying software development, Turing students or not, I challenge you to participate in at least one as it will give you a great assessment of your skills and show that you can think on your feet under pressure and time constraints. Some advice that I’d give, which could apply to any project, not just for a hackfest, is to use some agile practices and work in iterations. There’s no way you’re going to build the next hot fully fleshed out app in just a few hours, but the chances are you can build something that can be expanded upon later.</p>

<p>Here’s our project, just incase anyone was interested:</p>

<p>Demo app:
<a href="http://trollin.herokuapp.com/">http://trolio.herokuapp.com</a></p>

<p>Project repository:
<a href="https://github.com/tleskin/trolio">https://github.com/tleskin/trolio</a></p>

<p>Besides that, just have fun and happy hacking!</p>]]></content><author><name>Tom Leskin</name><email>tleskin@gmail.com</email></author><category term="coding" /><summary type="html"><![CDATA[Being a student at Turing can be a roller coaster of a time for seven months. You have practically no free time to do anything else, hence why I’m writing this blog post about a month and a half late. You experience ups and downs, times when you feel like the best programmer in the world and other times you’re doubting yourself and thinking this probably isn’t for me. In my experience though, all the hard work pays off and you eventually get to a break between the six week modules, known as an intermission week.]]></summary></entry></feed>